If You Give a Girl a Fireplace…
Have you ever read the book If You Give a Mouse a Cookie? That mouse lives in my head and he is me. This mouse is the reason I now know how to overgrout a stone veneer fireplace. The story goes like this: If you buy the Ashley a house, she’s going to want to replace the floor.
In all fairness, that had to be done. The house had mostly carpet and our family has some pretty bad allergies, so that was non-negotiable.
And if you are going to replace the floor, you might as well go ahead scrape off the popcorn ceiling first. If you have the ceiling destroyed, it’s the perfect opportunity to add can lights.
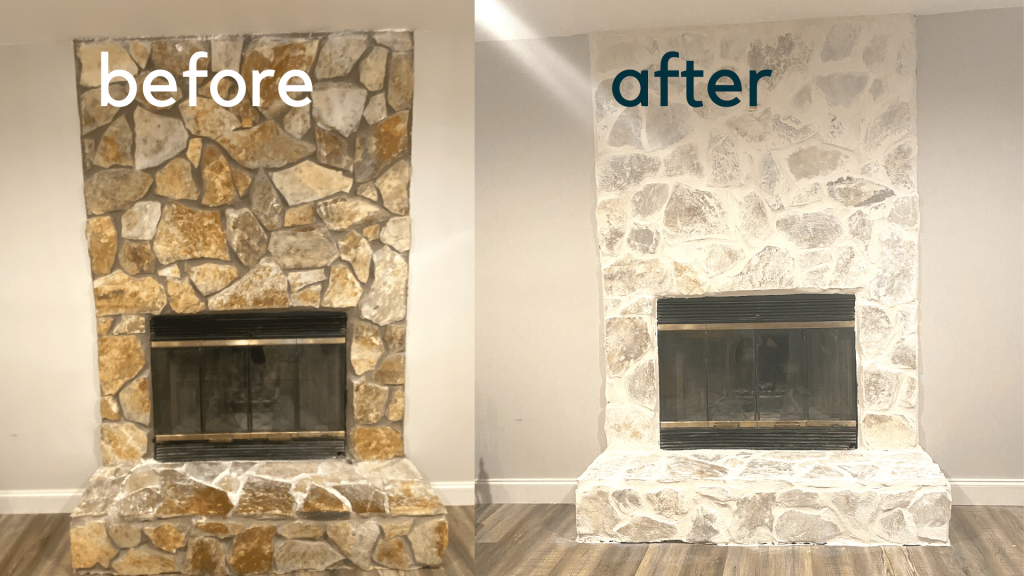
And it’s 2021, grey walls are mandatory (Totally joking, but, you know, Chip and Joanna Gaines and stuff.) If you paint the walls grey, the brown fireplace stone is not going to match anymore and if it doesn’t match anymore, you’re going to want to overgrout the stone veneer. You see how it goes?
She will want to tear down a wall?
It all seems logical to me! Although I did leave out some steps, somewhere in there we added new french doors and the wall that we took down and then put back up. It all makes sense, trust me.
Don’t tell my poor hubby, but we aren’t even done yet. We have a mantle situation. I’ll tell you about that in step two, after it happens and I manage to not cut off my typing finger.
So let’s talk about how to overgrout stone veneer. It’s really not as bad as some people on the interwebs have made it out to be. It was actually quite enjoyable.
How do you Overgrout a stone Fireplace?
The Preparations
- Prep; an ounce of prep is worth a pound of clean up. Vacuum that bad boy, wipe er down, and tape, paper, repeat. Cover your floors and don’t forget to tape off the walls and ceiling. This stuff WILL wipe off, but you will get a cleaner edge if you just tape it all off. Do it. Pre-taped plastic drop cloth is a miracle.

- Purchase your materials. Make sure you have everything you need before you get started. See the card below on specifics, but make sure you have what you need before you start. It is very frustrating to be ready to go and not have what you need. I’m speaking from experience. Time is included on this list because grout does not keep once mixed.

- Mix your grout. Friends, read the instructions carefully. Put on your reading glasses if necessary. I misread the bag the first time and added a gallon of water instead of a quart. Needless to say, I had to scrap ALL of that grout and start over. SMH

The Process
- Smear the grout with a gloved hand (grout will wear your hand raw) into your mortar and into all of the cracks of your stone. You can do a good-sized section at a time, the grout I used was pretty forgiving and gave me a good window to work in.

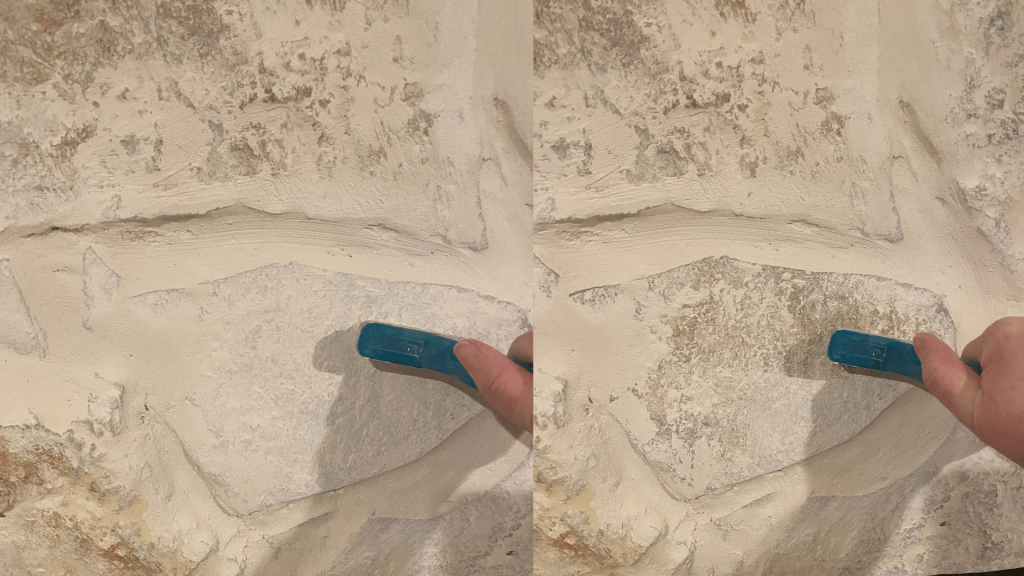
- Wipe the stones and smooth out the grout with a large sponge and a bucket of water. There is an art to this and you will have to work with it to find the look you are going for.

Completion
- Make adjustments. If you want more stone to show after it dries (mine dried lighter than I wanted), use a wire brush and brush off some of the grout from the stones, if you want want it to have more of a white-washed look, wipe on more. This is a process and an art, not a science or a recipe.

- Clean Up. If done shortly after the time that you complete your project, the grout comes right off. I was able to wipe it off my walls, ceiling and floor with no issues. Finally, I recommend rinsing your buckets out pretty quickly and wiping off any spatulas that you might have used because it will eventually dry pretty hard.
Let’s talk about grout, Bay-bee
If you know what song I’m referring to, you are definitely old enough to be overgrouting your fireplace. If you don’t, please don’t look it up and you can also grout your fireplace.
Alright, enough of that mouse chase, back to the grout. I used Mapei Ultracolor Plus FA powder in the color Avalanche. I did not want it to be too bright white. Avalanche is subtly off-white. This turned out to not be as big of a deal for me because the stone pulled enough warmth and variation to keep it from being jarringly stark white. My wall color is Benjamin Moore Gracious Greige and my trim is pure white. It all plays together very nicely.
Shopping for Grout
I’m going to be honest with you here, I got mine at Lowe’s and it was much cheaper than the offerings on Amazon. I paid around $17 for the 10 lb. bag. I have also seen people use the pre-mixed stuff in the tubs. That was more than double the price for me.
I ended up using 35 lbs of powdered grout on my fireplace. I would say that mine is probably on the smaller size. The amount you will need depends on the size of your fireplace.
I would recommend checking with your local hardware stores and the online options. The premixed is definitely easier, but the powder was not bad and much cheaper. Just be sure to mix it in a well ventilated area and strongly consider a mask. This stuff is super fine and not fun to inhale.
The Process
Ok, you’ve gathered your materials, you’ve prepped your area and you are ready to go. Take a deep breath, this is going to be messy, but it will be beautiful when you are finished.
I started by grabbing a handful and smearing it in the mortar lines. Some videos I watched included piping bags and spatulas. I didn’t even consider using a piping bag, I’m all about efficiency. What I did find was that the metal drywall spatula was very helpful in places like the edge of the ceiling, wall and floor. I wanted clean lines there and not a gloppy mess.
For the rest, I just went at it K4 style. I channeled my inner preschooler and had a viscerally tactile experience. It was great. I did about a third of my fireplace at a time before I started in with the sponge.
The Sponge
Again, if you get this reference, I am sorry. It’s been a long day. Nevertheless, a large sponge, the kind you get at Lowes or the car washing section at Walmart is a great choice. Amazon might even be a viable option for this one.
You will also need 2 big buckets (or more) of fresh water. It is not that big a deal if the water gets dirty if you are going for a more white-washed effect. If you want your rocks cleaner, you will need to change your water more frequently.
After you wet your sponge, squeeze out as much excess water as possible. You don’t want water dripping and puddling everywhere. Wipe down the surface of the rocks to reveal as much or as little as you’d like. This is also your opportunity to smooth out your grout areas.
Finishing Touches
I went for a thick coating of grout between my rocks because I wanted to smooth out the surface of my fireplace as much as possible. I knew a mantel was in my future and I wanted it to lean smoothly against the fireplace.( It turns out the antique, freestanding mantel that my dad and I assembled and refinished for my old house was not going to fit in the new house, so I will have my work cut out for me on that one.)
Once you get the grout applied, smoothed and wiped to your satisfaction, let it dry for an hour or two and step back and look at it. Mine ending up drying lighter than the initial application. I opted to remove more of the grout with a very stiff bristled brush. I found it in my garage and I have no idea where it came from, but I’d imagine that a wire bristle brush will probably suffice.
How To Overgrout a Stone Fireplace (German Smear)

Transform your fireplace with this over-grouting technique, also called German Smear.
Materials
- Mapei All-in-One powdered grout (I used 1 10 lb. bag and 1 25 lb. bag. It was the perfect amount for my smallish fireplace.) I used the color avalanche.
- Painter's tape
- Newspaper or plastic drop cloth
- water (amount according to package instructions)
Tools
- plastic gloves
- metal painter's spatula
- large sponge from hardware store
- optional: stiff brush
- 2-3 5 gallon buckets
Instructions
- Prepare your area by vacuuming the stones well and wipe them down if necessary.
- Tape off the ceiling, wall, floor and insert with painters tape.
- Cover your insert or fireplace opening with newspaper and tape.
- Cover the floor area surrounding your fireplace with a drop cloth or newspaper.
- Mix your grout via the manufacturer's instructions. I tried a large industrial hand-held mixer, a stick and my hand, I found that a gloved hand worked best for me.
- Start at the top of your fireplace. With your spatula, smear the grout into the ceiling edge of your fireplace and into the cracks.
- Continue to press and smear the grout into all of the cracks and groutlines of stone, using the spatula or your gloved hand, whichever works best for you. You will need to play around to find your technique. You really can't mess this part up, you can wipe it off if you have too much and add more if there's not enough. Just get it on there.
- Using a damp sponge, wipe the stones until you get the look you want. Keep in mind that it will dry lighter.
- After it has dried, you can expose more rock by scrubbing with a stiff brush. You can also add more with some of your grout water.
- Clean up and admire your work. You did a good job and it looks amazing!
The End
If you’ve made it this far in the post, you are awesome and probably actually considering doing this yourself. I couldn’t be more pleased with the way my fireplace turned out. It is exactly how I envisioned it and creates the perfect foundation for all that I want to do in this area of my home. I also love the fact that it was not terribly expensive for such a huge transformation! Let me know if you have any questions and by all means, let me know if you try it!
Keep Dreaming!
Love,
Ashley

I am interested in doing this on the exterior of my home. Part of my house has these stone walls. My question is how well did this stick to the already mortar in the stone fireplace?
Hello! I am wanting to try this, but before I do, my cautious husband wanted to know if, two years later, you still love it? Has the grout done well over the veneer stone? Any cracking or chipping?